# 前言
昨天有个朋友让我帮他找个 销售管理系统 ,他是搞批发的,他说自己的电脑很早以前装了个销售管理系统,已经联系不到厂家了,现在这台电脑运行已经越来越慢了,电脑的操作系统还是 XP 的,他怕哪天系统挂了他就没有其他的系统记录销售流水和库存数据了
我大致了解了一下他的需求,然后就开始在 GitHub 上看看有没有免费开源的项目找个给他用,毕竟免费的它香嘛 _
# 华夏 ERP
经过一段时间搜索测试,有的 demo 体验好,但是没有一份比较完善的搭建和使用文档,有的文档很完善,但是功能略复杂,我朋友是个电脑小白,他又接受不了。之所以选择这个 华夏ERP ,是因为它的功能简单符合我朋友的要求,并且搭建起来也非常简单,说干就干,马上盘它。
先把整个项目 download 到本地,看了一下该项目支持 Windows 和 Linux ,我就选择 Linux 吧
# 安装项目
我这边选择的 Linux 操作系统是 CentOS 8 ,看了一下安装文档, linux 需要安装 jdk 和 mysql ,对方已经提供软件包的百度云盘下载地址,把下载下来的软件包用 WinSCP 上传到 CenOS , 用 RPM 命令安装,发现安装 mysql 报错了,缺少依赖,看了一下 mysql-5.8-528 这个版本也太老了,于是决定用 Mariadb 代替。
[root@CentOS ~]# ls | |
anaconda-ks.cfg jdk-8u45-linux-x64.rpm mysql-5.8-528.x86_64.rpm | |
[root@CentOS ~]# rpm -ivh jdk-8u45-linux-x64.rpm | |
Verifying... ################################# [100%] | |
Preparing... ################################# [100%] | |
Updating / installing... | |
1:jdk1.8.0_45-2000:1.8.0_45-fcs ################################# [100%] | |
Unpacking JAR files... | |
rt.jar... | |
jsse.jar... | |
charsets.jar... | |
tools.jar... | |
localedata.jar... | |
jfxrt.jar... | |
plugin.jar... | |
javaws.jar... | |
deploy.jar... | |
[root@CentOS ~]# rpm -ivh mysql-5.8-528.x86_64.rpm | |
error: Failed dependencies: | |
libncurses.so.5()(64bit) is needed by mysql-5.8-528.x86_64 | |
perl(DBI) is needed by mysql-5.8-528.x86_64 | |
[root@CentOS ~]# dnf -y install mariadb-server | |
Last metadata expiration check: 0:17:19 ago on Sun 06 Dec 2020 07:15:51 AM EST. | |
Dependencies resolved. | |
================================================================================================================================================================================================================= | |
Package Architecture Version Repository Size | |
================================================================================================================================================================================================================= | |
Installing: | |
mariadb-server x86_64 3:10.3.17- | |
Transaction Summary | |
================================================================================================================================================================================================================= | |
Install 10 Packages | |
Total download size: 25 M | |
Installed size: 133 M | |
Downloading Packages: | |
(1/10): psmisc-23.1-4.el8.x86_64.rpm | |
Installed: | |
mariadb-server-3:10.3.17-1.module_el8.1.0+257+48736ea6.x86_64 mariadb-backup-3:10.3.17-1.module_el8.1.0+257+48736ea6.x86_64 mariadb-gssapi-server-3:10.3.17-1.module_el8.1.0+257+48736ea6.x86_64 | |
mariadb-server-utils-3:10.3.17-1.module_el8.1.0+257+48736ea6.x86_64 perl-Math-BigInt-1:1.9998.11-7.el8.noarch perl-Math-Complex-1.59-416.el8.noarch | |
psmisc-23.1-4.el8.x86_64 mariadb-errmsg-3:10.3.17-1.module_el8.1.0+257+48736ea6.x86_64 perl-DBD-MySQL-4.046-3.module_el8.1.0+203+e45423dc.x86_64 | |
perl-DBI-1.641-3.module_el8.1.0+199+8f0a6bbd.x86_64 | |
Complete! |
安装完 mariadb ,用 systemctl 命令启动 mysql 并添加开机启动,然后初始化 MySQL
[root@CentOS ~]# systemctl start mariadb && systemctl enable mariadb | |
Created symlink /etc/systemd/system/mysql.service → /usr/lib/systemd/system/mariadb.service. | |
Created symlink /etc/systemd/system/mysqld.service → /usr/lib/systemd/system/mariadb.service. | |
Created symlink /etc/systemd/system/multi-user.target.wants/mariadb.service → /usr/lib/systemd/system/mariadb.service. | |
[root@CentOS ~]# mysql_secure_installation | |
NOTE: RUNNING ALL PARTS OF THIS SCRIPT IS RECOMMENDED FOR ALL MariaDB | |
SERVERS IN PRODUCTION USE! PLEASE READ EACH STEP CAREFULLY! | |
In order to log into MariaDB to secure it, we'll need the current | |
password for the root user. If you've just installed MariaDB, and | |
you haven't set the root password yet, the password will be blank, | |
so you should just press enter here. | |
Enter current password for root (enter for none): | |
OK, successfully used password, moving on... | |
Setting the root password ensures that nobody can log into the MariaDB | |
root user without the proper authorisation. | |
Set root password? [Y/n] | |
New password: | |
Re-enter new password: | |
Password updated successfully! | |
Reloading privilege tables.. | |
... Success! | |
By default, a MariaDB installation has an anonymous user, allowing anyone | |
to log into MariaDB without having to have a user account created for | |
them. This is intended only for testing, and to make the installation | |
go a bit smoother. You should remove them before moving into a | |
production environment. | |
Remove anonymous users? [Y/n] | |
... Success! | |
Normally, root should only be allowed to connect from 'localhost'. This | |
ensures that someone cannot guess at the root password from the network. | |
Disallow root login remotely? [Y/n] n | |
... skipping. | |
By default, MariaDB comes with a database named 'test' that anyone can | |
access. This is also intended only for testing, and should be removed | |
before moving into a production environment. | |
Remove test database and access to it? [Y/n] | |
- Dropping test database... | |
... Success! | |
- Removing privileges on test database... | |
... Success! | |
Reloading the privilege tables will ensure that all changes made so far | |
will take effect immediately. | |
Reload privilege tables now? [Y/n] | |
... Success! | |
Cleaning up... | |
All done! If you've completed all of the above steps, your MariaDB | |
installation should now be secure. | |
Thanks for using MariaDB! |
用 Navicat 15 for MariaDB 连接数据库发现连不上,用 telnet 测试发现端口不通
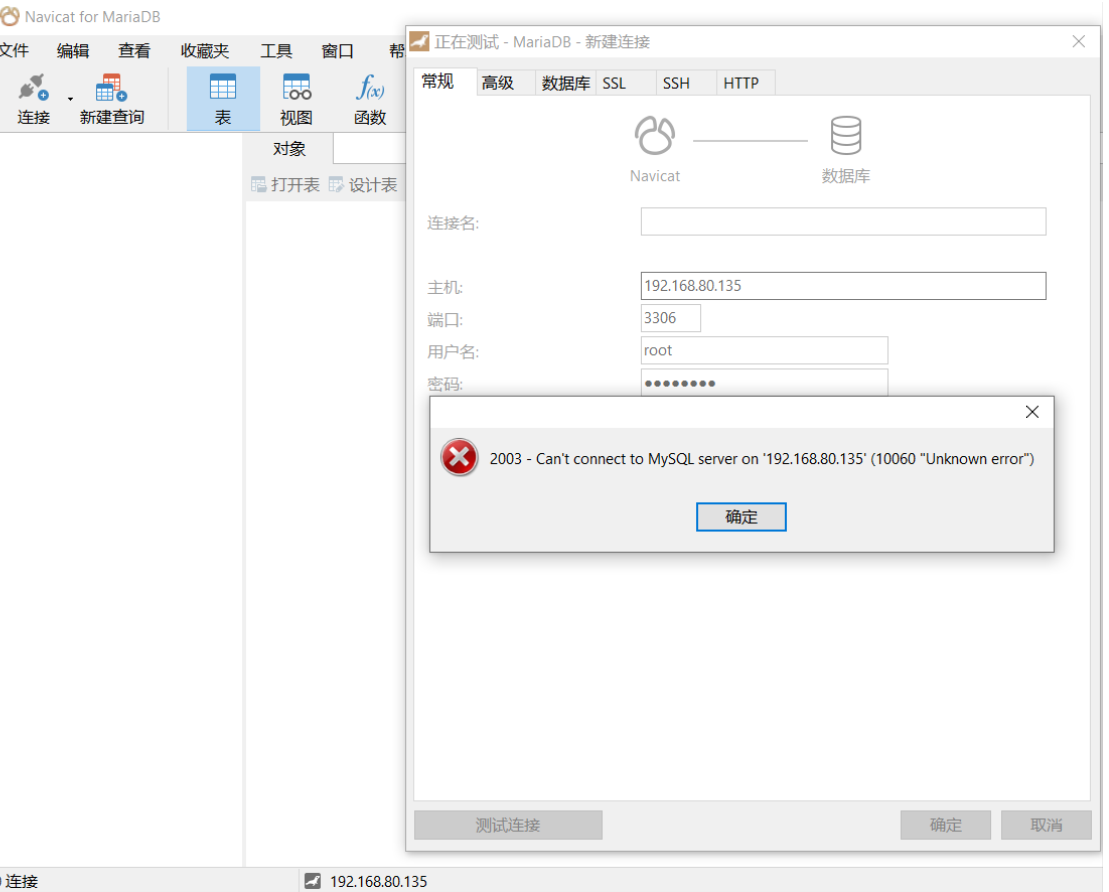

关闭 firewalld 再测试连接正常,但是登陆后依然报错估计是权限问题
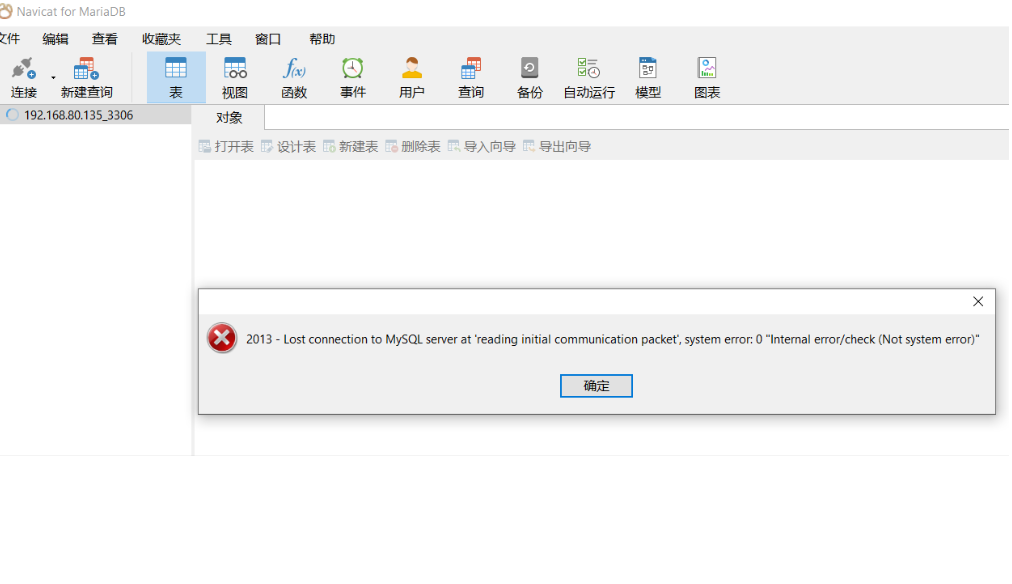
登录 mysql 添加权限后,再用 Navicat 15 for MariaDB 连接登录正常了
[root@CentOS ~]# mysql -uroot -p | |
Enter password: | |
Welcome to the MariaDB monitor. Commands end with ; or \g. | |
Your MariaDB connection id is 19 | |
Server version: 10.3.17-MariaDB MariaDB Server | |
Copyright (c) 2000, 2018, Oracle, MariaDB Corporation Ab and others. | |
Type 'help;' or '\h' for help. Type '\c' to clear the current input statement. | |
MariaDB [(none)]> GRANT ALL PRIVILEGES ON *.* TO 'root'@'%'IDENTIFIED BY 'password' WITH GRANT OPTION; | |
Query OK, 0 rows affected (0.000 sec) | |
MariaDB [(none)]> flush privileges; | |
Query OK, 0 rows affected (0.000 sec) | |
MariaDB [(none)]> quit | |
Bye |
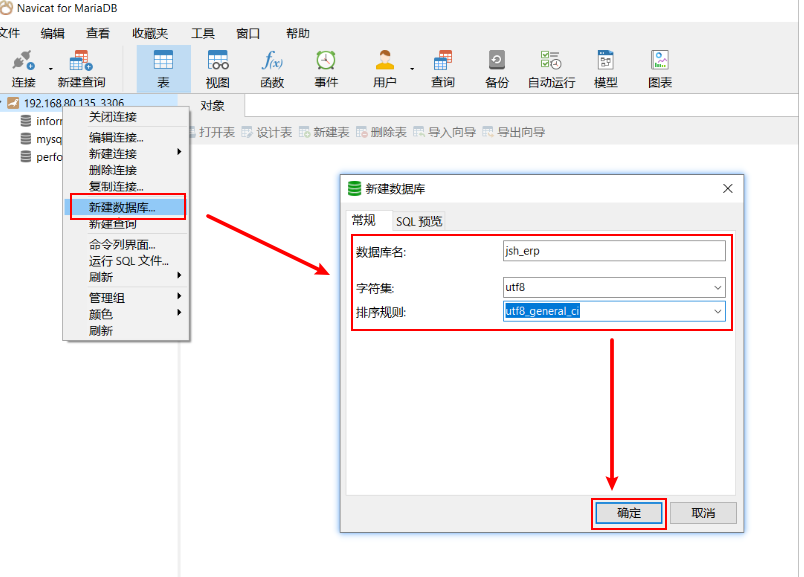
新建一个数据库,数据库名 jsh_erp , 字符集 utf8 , 排序 utf8_general_ci
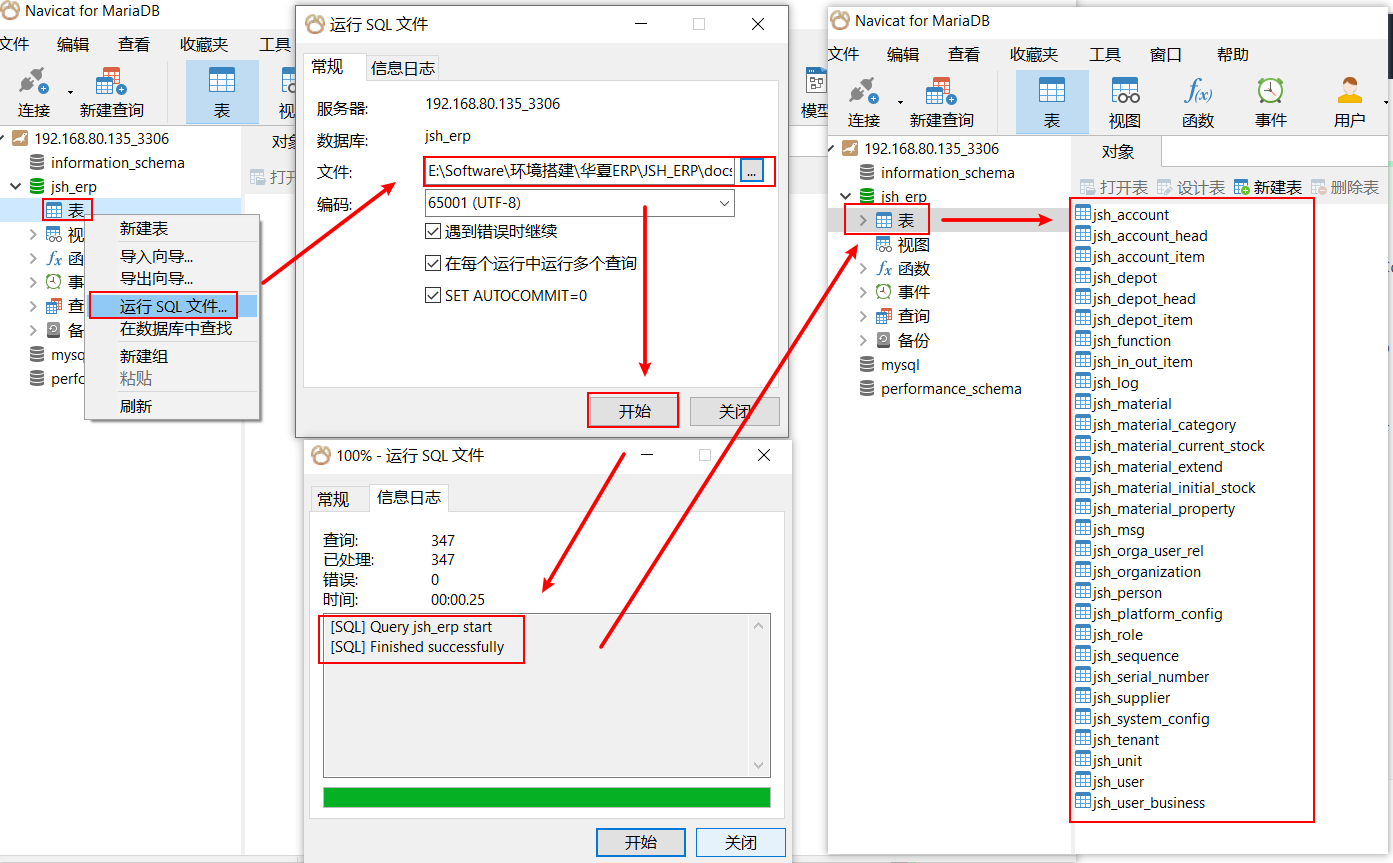
导入数据库数据需要 运行项目sql文件 ,sql 文件在项目根目录的 docs 文件夹下面,看到提示 sucessfully 就代表数据库导入成功,刷新数据库,可以看到里面的数据表
# 项目配置
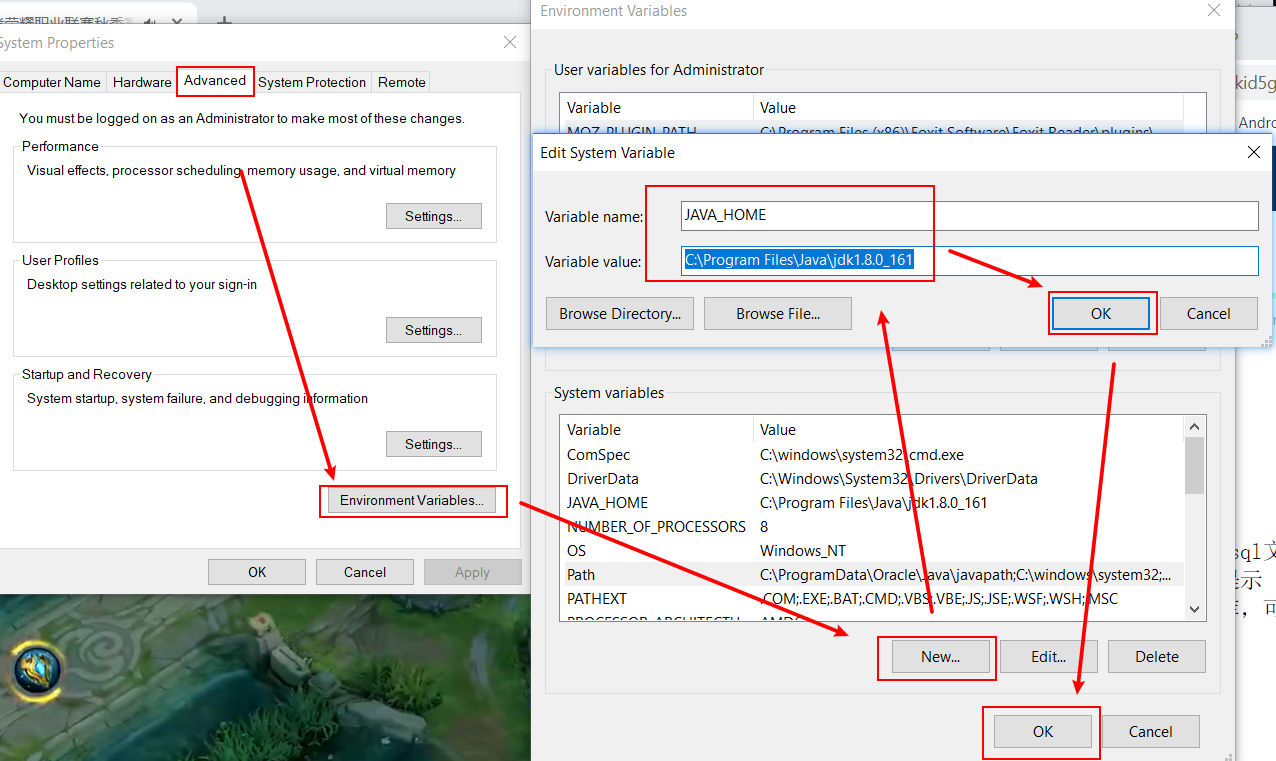
现在需要用 maven 将项目打包, Windows 需要安装 JDK ,并配置系统环境变量
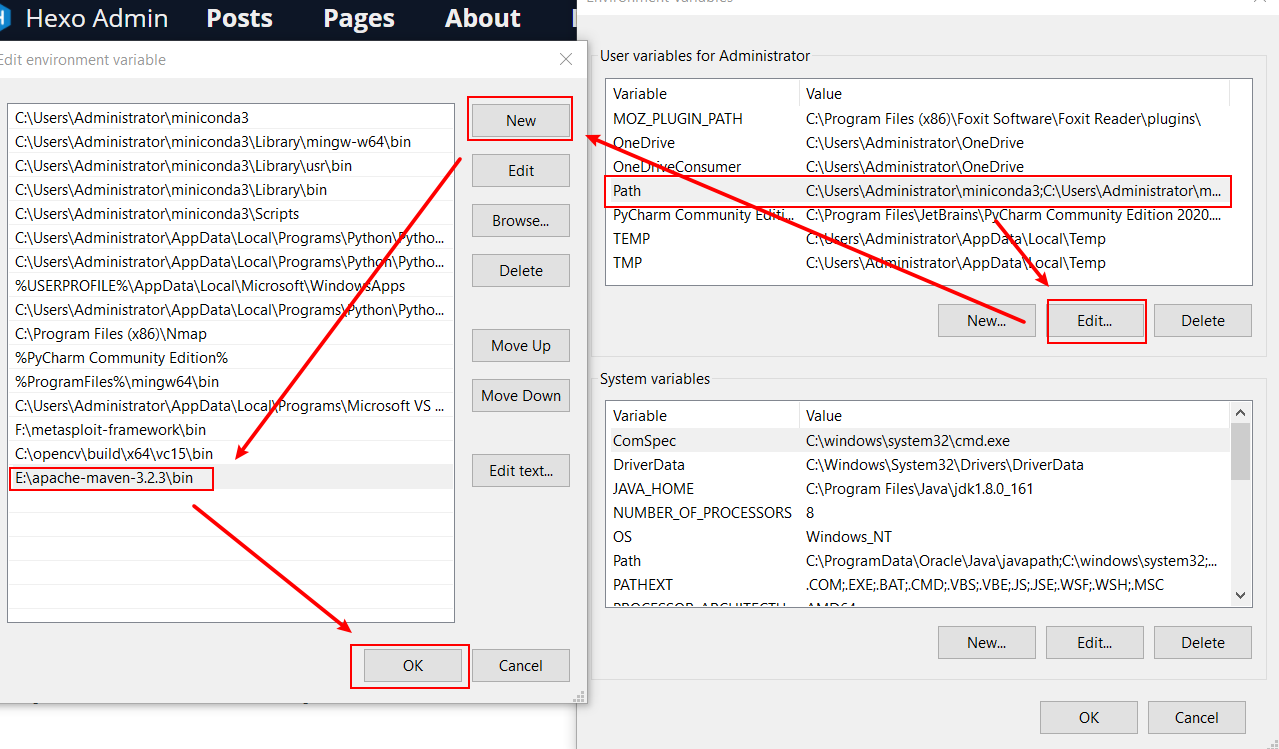
然后把 apache-maven-3.2.3-bin.zip 解压出来,我这边解压到 E 盘根目录,然后在 path 变量添加 apache-maven-3.2.3\bin 的路径
最后用 mvn 命令打包项目,打开 cmd ,用 cd 命令切换到项目根目录,输入 mvn clean install 将项目打包,这个过程应该需要等待挺长时间的,反正我等了差不多十分钟,取决于你的网速。
命令执行完后显示 success 表示打包完成,此时目录多了一个 dist 的目录,把里面的 jshERP2.0-bin.zip 解压出来上传到 CentOS

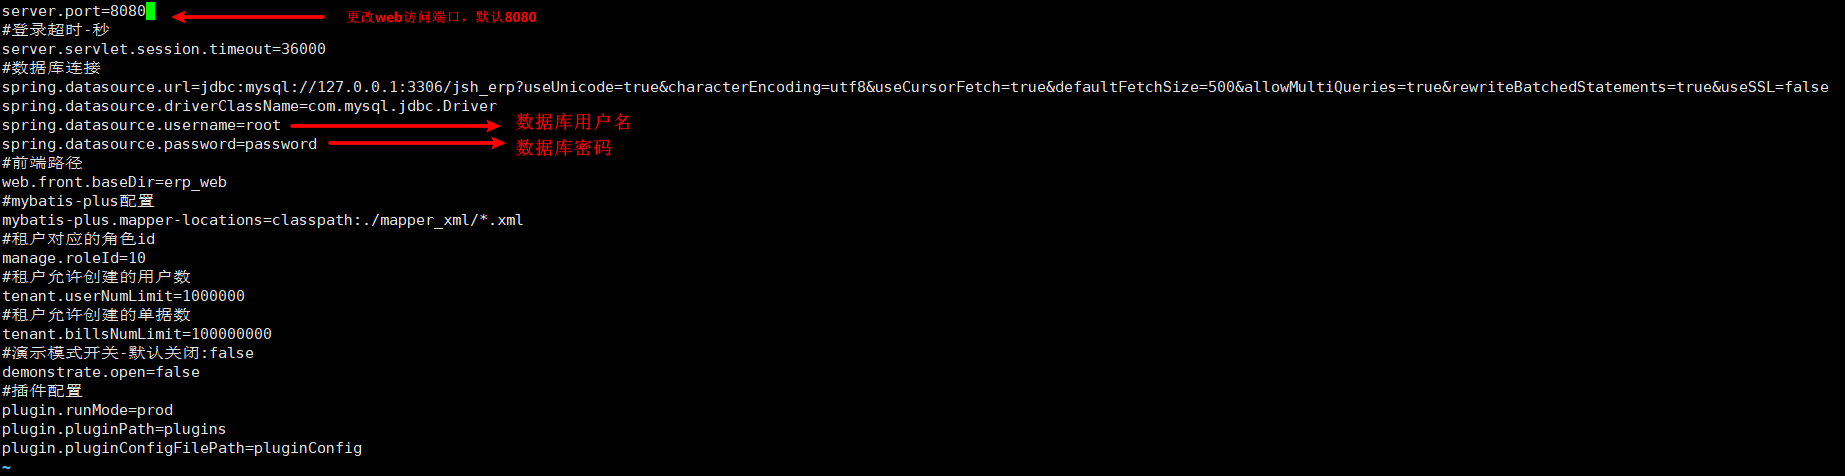
ssh 连接 CentOS ,进入 jshERP2.0/config 目录,编辑 application.properties 文件,更改数据库的用户名和密码,web 端口默认 8080 ,需要的自己更改
[root@CentOS ~]# cd jshERP2.0/ | |
[root@CentOS jshERP2.0]# ls | |
bin config docs erp_web lib logs README.md restart.sh start.bat start.sh status.sh stop.sh | |
[root@CentOS jshERP2.0]# cd config/ | |
[root@CentOS config]# ls | |
application.properties logback-spring.xml | |
[root@CentOS config]# vi application.properties |
更改完后,用 chmod -R 755 jshERP2.0 更改根目录权限,添加权限后运行 start.sh 脚本启动,提示 Starting ... SUCCESS! 说明程序运行成功

此时打开了浏览器,输入 CenotOS 主机的 IP 地址端口号 8080 ,成功显示登录页面,注册个账户登录正常
Note:
如果脚本运行成功无法访问,请检查是否被防火墙拦截了。
如果脚本运行失败,则检测 application.properties 配置的 mysql 用户名和密码是否有误。

本地测试了一下没有发现什么问题,就直接把项目部署到自己阿里云服务器了,然后告诉我朋友域名和端口,剩下的就靠他自己去摸索了,毕竟我也不会用